Updated Vishwas Sharma Tutorial 18 min read
How to Convert Horizontal Videos to Vertical Without Cropping
Learn how to convert horizontal videos into vertical formats for YouTube Shorts, Instagram Reels, and TikTok without losing important content or spending hours in a complex video editor.
Introduction
If you’ve ever tried to repurpose a horizontal video for Instagram Reels, TikTok, or YouTube Shorts, you already know the frustration. You open your footage, try to squeeze a 16:9 clip into a 9:16 frame, and suddenly half the screen is gone — your subject is cut off, the text overlay is missing, or the most important action in the video is somewhere outside the visible area.
This is one of the most common problems creators face when repurposing content across platforms. Horizontal video is still the default format for most cameras, recording setups, gaming captures, podcasts, and long-form YouTube content. But the platforms where that content gets the most engagement today — TikTok, Instagram Reels, YouTube Shorts, Reddit — all expect vertical video.
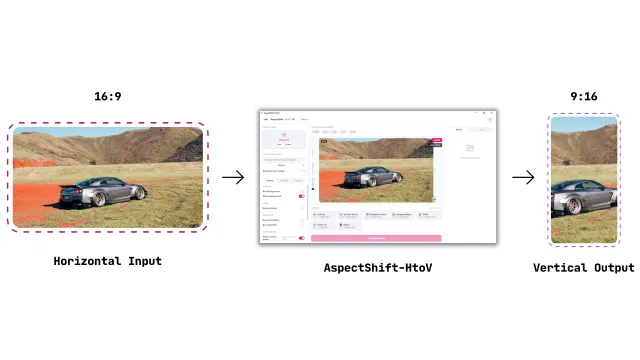
The good news is that converting horizontal footage to vertical does not require you to learn a professional editing suite, spend hours manually adjusting keyframes, or buy expensive software. AspectShift-HtoV is a Windows desktop app built specifically for this workflow. You select your videos, pick your target aspect ratio or platform preset, press Convert, and your footage comes out reframed and platform-ready — with your content intact.
This guide walks you through why vertical video matters, where traditional cropping fails, and how to use AspectShift-HtoV to convert your horizontal clips cleanly every time.
Learn more about AspectShift-HtoV
Why Vertical Video Matters Today
Most people watch video on their phones — and phones are held vertically. That single fact has reshaped what every major social platform optimizes for, how their algorithms surface content, and what users expect when they open an app.
When you post a horizontal video on a vertical-first platform, the player has to letterbox it, shrinking the frame down and filling the rest of the screen with black bars. The subject becomes small, the text becomes unreadable at a glance, and the viewer has to consciously pay attention instead of the content filling their screen naturally. On platforms that are competing for milliseconds of attention during a scroll, that difference matters.
Vertical video fills the entire phone screen. There is no wasted space. The viewer sees more, hears better, and stays engaged longer — which is exactly why every major social platform has built dedicated vertical video infrastructure.
Which Platforms Prefer Vertical Video?
YouTube Shorts — The preferred aspect ratio is 9:16 at 1080×1920. Shorts are surfaced in a dedicated vertical feed and on the home page. Viewers expect the content to fill the screen, and horizontal videos appear noticeably smaller in this feed.
Instagram Reels — The preferred aspect ratio is 9:16 at 1080×1920. Reels play full-screen, and captions, stickers, and interactive elements are designed around portrait framing. A horizontal clip posted as a Reel loses significant screen real estate and feels out of place.
TikTok — The preferred aspect ratio is 9:16 at 1080×1920. TikTok was built from the ground up for vertical video, and its discovery algorithm — the For You Page — is designed for full-screen portrait content. Horizontal videos can feel like a mismatch with the rest of the feed.
Facebook Reels — The preferred aspect ratio is also 9:16. Facebook’s mobile feed is dominated by vertical viewing, and Reels shown in the main feed reward content that fills the screen on a phone held upright.
The Biggest Problem With Cropping Videos
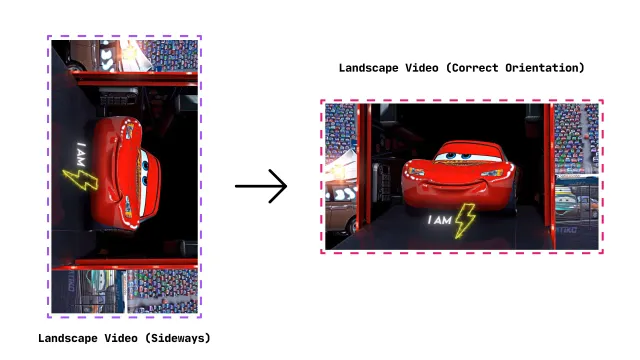
The most obvious way to convert a horizontal video to vertical is to crop it: take the wide 16:9 frame, select a 9:16 slice from somewhere in the middle, and discard the rest. This is what most video editors default to when you change the aspect ratio.
The problem is that a standard center crop assumes the most important content is always in the middle of the frame — and that is almost never true for real footage.
In a gaming clip, the health bar and minimap are in the corners. In a podcast, two speakers might be sitting on opposite sides of the frame. In a tutorial, the mouse cursor and the interface element you’re explaining are wherever they happen to be on screen. In a product demo, the hands and the product are arranged across a wide frame. A center crop cuts out most of this context and leaves you with a narrow slice that misses the point of the original footage.
Traditional video editors handle this with manual reframing — you set keyframes, adjust the crop position frame by frame, and track the action across the clip. It works, but it requires real editing knowledge, takes time, and has a steep learning curve if you’re not already comfortable inside a professional timeline editor.
When Cropping Works
Center cropping is acceptable in a narrow set of cases: talking-head footage where the speaker is already centered in the original frame, simple screen recordings where all the action is in the middle, or footage that was specifically composed with a vertical crop in mind. If your content was shot or designed to be centered, a basic crop can work without issue.
When Cropping Fails
Center cropping fails on virtually any footage that was composed for a wide frame: gaming clips with HUD elements in the corners, group interviews with multiple speakers, tutorials where the action moves around the screen, product demonstrations where the product and the hands are spread across the frame, and any footage that uses text overlays, lower thirds, or titles positioned at the edges.
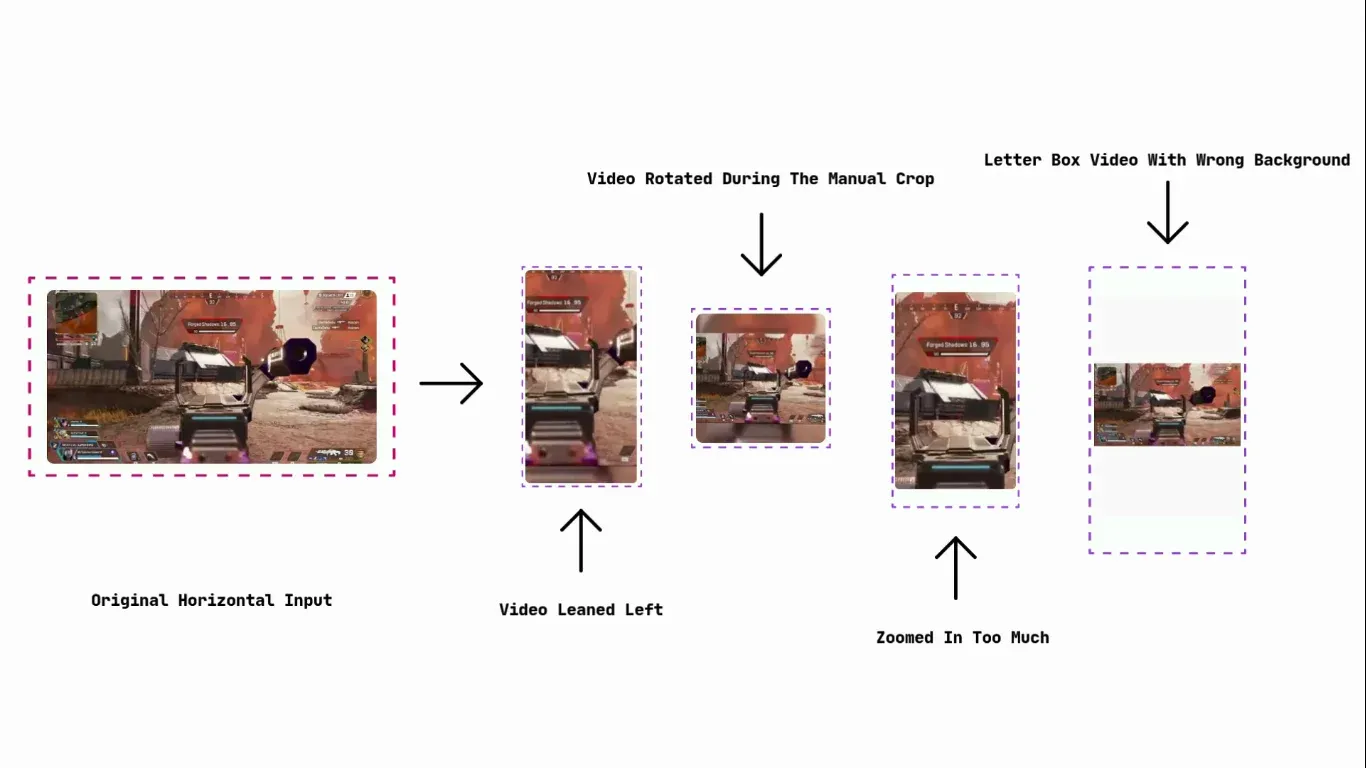
Bad crop example showing important content cut off
Common Ways To Convert Horizontal Videos To Vertical
There are three main approaches most people try when they need to convert a landscape video to portrait format. Each has real tradeoffs worth understanding before you pick your workflow.
Method 1: Manual Video Editing
Professional editors like DaVinci Resolve, Adobe Premiere Pro, or Final Cut Pro can handle aspect ratio conversion, but they require you to understand the software first. You need to know how to create a new sequence or project at the target resolution, how to drop your existing footage into it, how to scale and position the clip, and — if you want smooth results — how to set keyframes to track the subject across the timeline. For someone who edits regularly, this is manageable. For a creator who just wants to quickly reformat clips before posting, the learning curve and setup time are significant barriers.
Method 2: Simple Cropping
Cropping tools and aspect-ratio converters — including many online tools — let you pick a frame and discard the rest. It’s fast, but as described above, it almost always removes important content unless your footage was composed with a center-heavy framing in mind. For anything more complex than a talking head, a simple crop will likely leave you with an output that looks wrong.
Method 3: Background Fill And Reframing
The third approach — and the one that preserves the most visual information — is to fit the original horizontal clip inside the vertical frame and fill the empty space on the sides with a background effect. This could be a blurred version of the video itself (so the background feels contextually related), a solid white or black fill, or a branded background. The original footage is kept visible at its original proportions, centered in the frame, and the background fills the rest. This approach is what AspectShift-HtoV is built around.
How To Convert Horizontal Videos To Vertical Without Losing Important Content
AspectShift-HtoV handles the entire conversion workflow from a single window. There is no timeline, no layer system, no keyframe editor. Here is how the process works, step by step.
Step 1: Import Your Video
Open AspectShift-HtoV. In the left sidebar, click Files to select one or more video files, or click Folder to point the app at a directory. You can also drag and drop video files directly onto the import area. The app supports MP4, MOV, MKV, AVI, and WebM files.
Once you’ve added your files, the center panel updates with a live preview of the first video so you can see exactly how the output will look before converting anything.
Step 2: Select A Vertical Format
Below the preview, you’ll see the Aspect Ratio Targets row and the Presets grid. Choose the format that fits your target platform:
- 9:16 — The standard vertical format for TikTok, Instagram Reels, YouTube Shorts, and Facebook Reels. Use this for virtually all short-form social content.
- 4:5 — A slightly wider portrait format (1080×1350) that works well for Instagram feed posts and Reddit. It shows more of the original horizontal frame than 9:16 does, so less background fill is needed.
- 2:3 — A tall portrait format used for Pinterest and some editorial contexts. Good when you want a portrait crop that is slightly less extreme than 9:16.
You can also select multiple formats at once — for example, 9:16 and 4:5 at the same time — and the app will produce a separate output file for each format in a single batch run.
If you prefer to target a specific platform directly rather than picking a raw ratio, use the Presets grid. Built-in presets include YouTube Shorts (1080×1920), Instagram Reels (1080×1920), Instagram Square (1080×1080), TikTok (1080×1920), Reddit, and Twitter/X, among others. Each preset applies the correct resolution, encoding quality, and audio bitrate for that platform automatically.
Step 3: Adjust Framing
The center panel shows a live preview of your video inside the selected output frame. The preview updates in real time as you change settings, so you can see exactly what the output will look like before committing to a conversion.
If you want to preserve the full width of the original video without cropping any edges, enable Blur Background in the left sidebar under Effects. This fits your horizontal clip inside the vertical frame and fills the background with a softly blurred version of the same video, so the background feels visually connected to the content rather than a plain color block. You can adjust the blur sigma to make the background softer or sharper.
If you prefer a clean, neutral look, enable White Background instead. This places your video over a white fill — a common style for meme reposts and product content.
If your footage is already close to a vertical framing, you can leave both background effects off and let the app crop to fill the frame directly.
Step 4: Apply Background Effects
For gaming clips, podcast highlights, tutorials, and any footage where the full frame contains important context, the blur background effect is usually the best choice. It keeps every pixel of your original footage visible while making the output look intentional rather than letterboxed.
You can also add a logo overlay from the Effects tab — useful if you’re repurposing content under a brand. Set the position (top-left, top-right, bottom-left, bottom-right), scale, and opacity, and the logo will be composited onto every output file in the batch.
If you need automatic subtitles burned into the output — useful for accessibility and for platforms where users scroll with sound off — AspectShift-HtoV can generate them, customize their font style, color, transparency, and size, then export them with your videos once the optional subtitle dependency is downloaded.
Step 5: Export Platform-Ready Versions
Set your output directory by clicking Browse in the left sidebar. When you’re ready, click Convert Now for a single file, or Start Batch to process all selected files across all selected targets at once.
The app processes everything locally — nothing is uploaded to a server. Outputs are saved directly to your chosen folder, organized by target format if you have the subfolder option enabled. Each output file is named automatically to reflect the source file and the applied ratio or preset, so you can keep multiple format variants in the same folder without confusion.
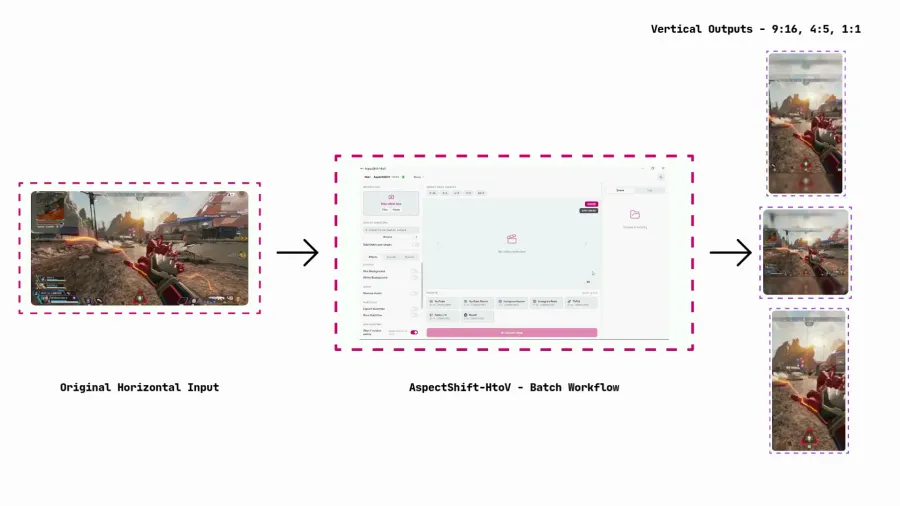
Converting Multiple Videos At Once
One of the most practical capabilities of AspectShift-HtoV is its batch processing. Instead of converting one video at a time — adjusting settings, waiting for the export, opening the next file, repeating — you can queue an entire folder of clips and have them all converted in a single run.
The Problem With Manual Reframing
When you’re repurposing a series of videos — weekly podcast highlights, a set of gaming clips, a month’s worth of tutorial snippets — doing each one individually creates a bottleneck. Manual reframing in a traditional editor means opening each clip, adjusting the crop, checking that the subject is in frame, exporting, waiting, and moving on. For five clips, this is annoying. For twenty clips, it becomes a significant time investment.
The settings also have to be re-applied for each file. Every time you open a new clip, you have to remember what export settings you used last time, what blur sigma you preferred, whether you used subfolders, and which preset you targeted. Inconsistency creeps in.
Benefits Of Batch Processing
Consistent output settings — In AspectShift-HtoV, your effects, encoding profile, aspect ratio targets, and output directory are all set once and applied to every file in the batch. Every output uses the same blur setting, the same quality preset, the same format. Your library of converted clips will be visually consistent.
Faster publishing — Instead of waiting for each conversion before starting the next, the app works through your entire queue sequentially. You set it running and come back to a folder of finished files. For creators with a regular publishing cadence, this can shave hours off the weekly repurposing workflow.
Less repetitive work — The queue panel on the right shows the status of every job — queued, processing, completed, or failed — so you can monitor progress at a glance. There is no need to babysit each individual export.
Better workflow efficiency — You can combine multiple targets in a single batch. If you need both a 9:16 version for TikTok and a 4:5 version for Instagram in one run, select both formats before starting and the app will produce both outputs for every input file automatically.
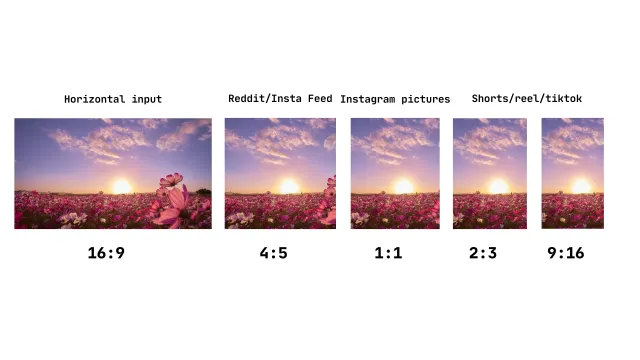
Best Vertical Formats For Different Platforms
Choosing the right aspect ratio depends on where you’re publishing and how much of the original frame you want to preserve.
9:16
The dominant vertical format. At 9:16 (1080×1920), your video fills the entire screen on any modern smartphone held upright. This is the correct format for TikTok, YouTube Shorts, Instagram Reels, and Facebook Reels. If short-form social is your primary destination, 9:16 is the format to use.
4:5
At 4:5 (1080×1350), this format is taller than a standard landscape frame but not as tall as a full 9:16. It shows more of the original horizontal content than 9:16 does, so background fill covers less of the frame. It’s the preferred format for Instagram feed posts and works well for Reddit video uploads. If you want to preserve more of the original framing while still posting in a portrait orientation, 4:5 is a good middle ground.
1:1
The square format (1080×1080) is not technically portrait, but it’s a common export target for Instagram feed posts and some LinkedIn video use cases. For horizontal footage, a 1:1 crop requires less background fill than 9:16 does and can work well for footage where the subject is centered.
2:3
At 2:3 (roughly 1080×1620), this format sits between 4:5 and 9:16. It’s less commonly used but appears on Pinterest and in some editorial and e-commerce contexts where a tall portrait image or video is needed. It gives a significant portrait feel while cutting off slightly less of the horizontal frame than 9:16.
| Format | Best for | Why use it |
|---|---|---|
| 9:16 | TikTok, YouTube Shorts, Instagram Reels, Facebook Reels | Fills the full phone screen in vertical feeds |
| 4:5 | Instagram feed posts, Reddit | Shows more of the original wide frame while still portrait |
| 1:1 | Instagram feed, LinkedIn | Square crops well for centered subjects, no tall fill needed |
| 2:3 | Pinterest, editorial, e-commerce | Tall portrait feel with slightly less crop than 9:16 |
Use Cases
Gaming Clips
Gaming footage is one of the hardest content types to center-crop. The HUD — health, ammunition, minimap, ability cooldowns — is deliberately placed at the edges of the screen so it doesn’t obscure the center of the action. A standard center crop removes all of it. With AspectShift-HtoV and a blur background enabled, the full game frame appears as the centered foreground inside the vertical output, with a blurred version of the same frame filling the empty space. The HUD stays visible, the gameplay is fully intact, and the output looks intentional rather than clipped.
Podcast Highlights
Podcast clips typically show two or more speakers in a wide split-screen arrangement. Neither speaker is centered; they’re positioned left and right of frame. A center crop shows a desk and a microphone stand. With a blur background or a white fill, both speakers remain visible inside the vertical frame, properly sized and readable. For short podcast highlight clips shared on Reels or Shorts, this approach makes the content immediately legible without any manual reframing.
YouTube Repurposing
Long-form YouTube content is recorded in 16:9 and often contains screen recordings, talking-head segments, b-roll, and text overlays that are all composed for a wide frame. When repurposing these clips into Shorts or Reels, AspectShift-HtoV lets you select the relevant segment (or the whole file), apply your target format, and convert it in seconds. The blur background effect is particularly effective here — the original wide-screen composition is preserved and visible, and the background fill keeps the output looking polished rather than letterboxed.
Educational Content
Tutorial and how-to videos often involve screen recordings with cursor movement, on-screen text, and UI elements spread across the full width of the frame. Cropping to 9:16 will typically cut off the very part of the screen you’re trying to show. Using a 4:5 or 9:16 output with blur background keeps the full screen recording visible and centered, which means the tutorial content remains readable and useful even in a vertical format.
Product Demonstrations
Product demos show the product, the presenter’s hands, and often on-screen text or annotations — all arranged across a wide frame. A center crop almost always removes context. By fitting the full demonstration inside a vertical frame with a background fill, the entire product, hands, and any supporting text remain visible, and the output is suitable for posting on Instagram, TikTok, or Pinterest product content.
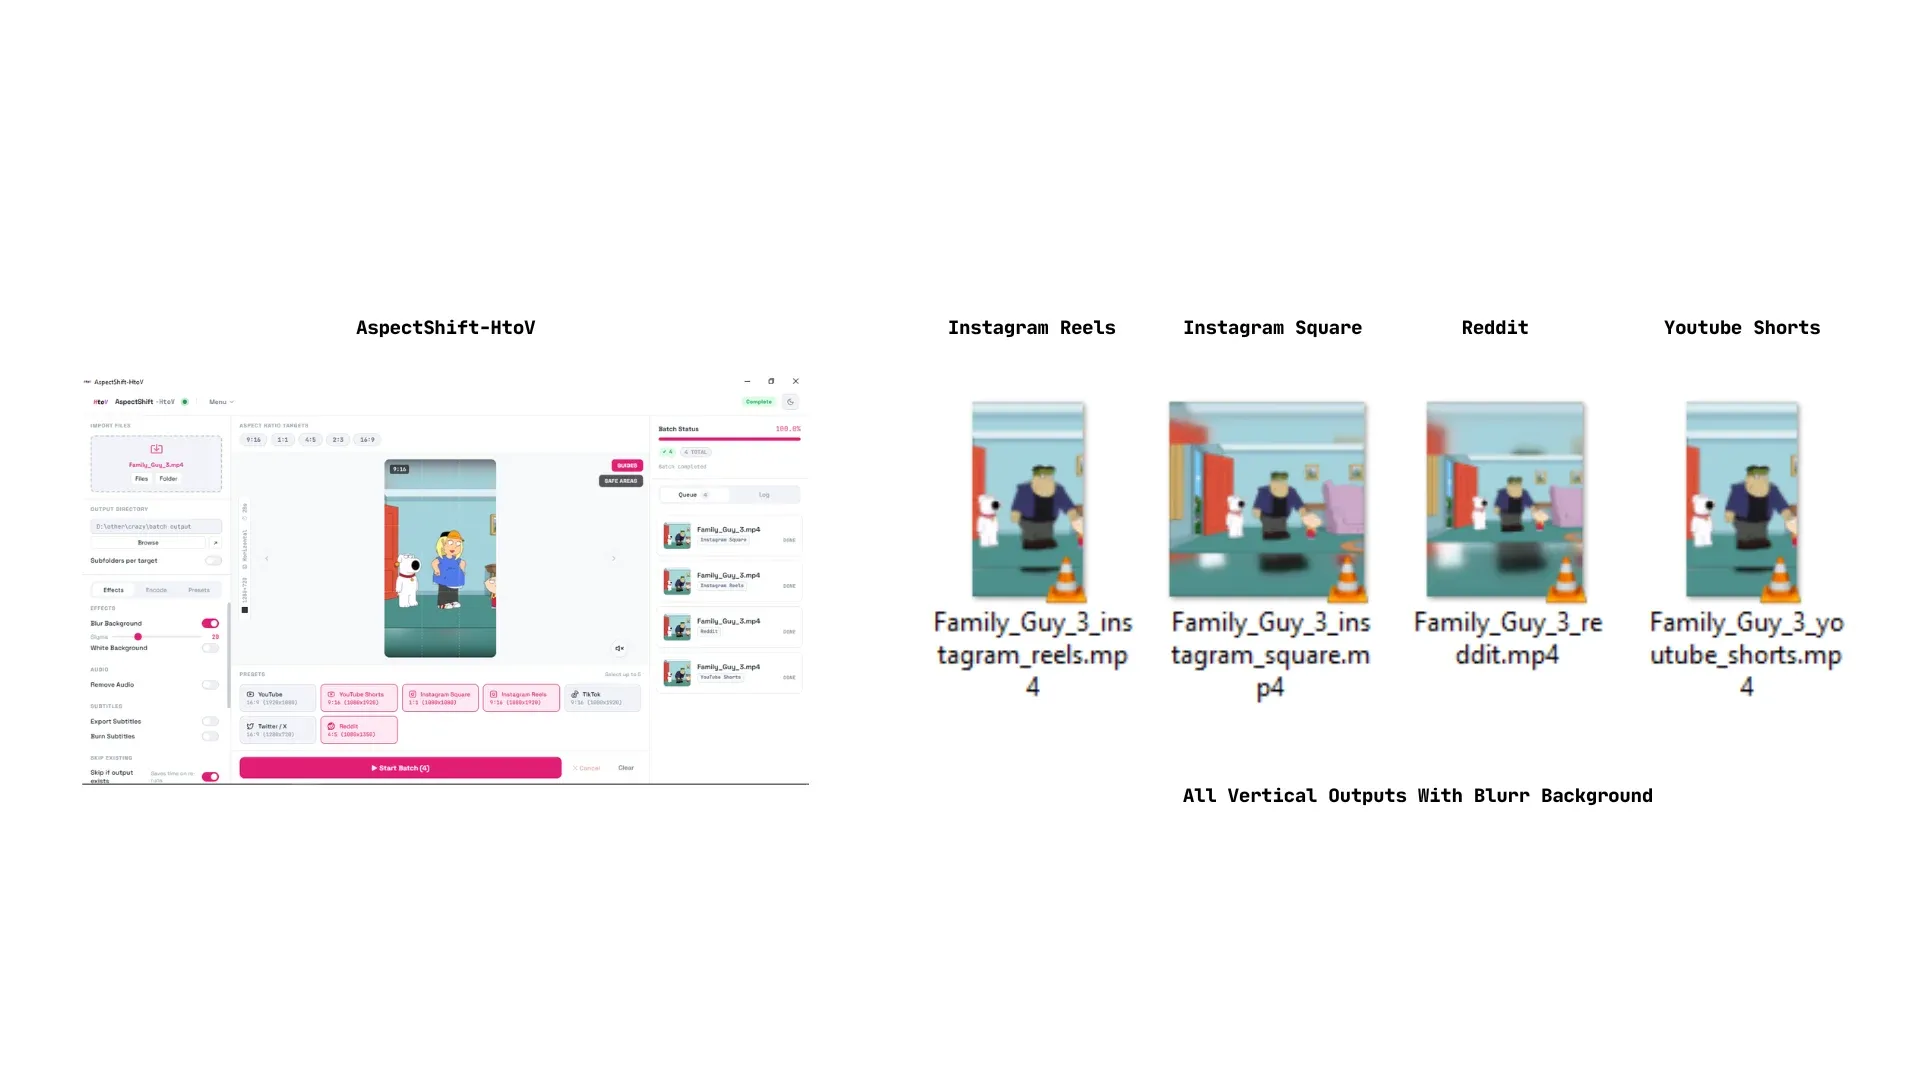
Multiple social media output formats created from one video
Frequently Asked Questions
Can I convert a landscape video to portrait without cropping?
Yes. AspectShift-HtoV handles this with background fill effects. When you enable Blur Background, the app fits your original horizontal video inside the vertical frame at its full aspect ratio, then fills the empty space with a blurred version of the same video. The entire original frame stays visible — nothing is cropped. If you prefer a solid background, the White Background option works the same way with a white fill instead.
What is the best aspect ratio for YouTube Shorts?
YouTube Shorts requires a 9:16 aspect ratio at a resolution of 1080×1920. AspectShift-HtoV includes a built-in YouTube Shorts preset that applies the correct resolution, quality settings, and audio bitrate automatically. Just select the YouTube Shorts preset, add your clips, and export.
Does vertical video perform better than horizontal video?
On vertical-first platforms — TikTok, Instagram Reels, YouTube Shorts, and Facebook Reels — vertical video consistently gets better distribution because it is the native format the platform is built around. These platforms fill the phone screen with vertical content, and horizontal videos are either letterboxed or scaled down, both of which reduce visual impact and tend to result in lower engagement. For content specifically created for these platforms, converting to vertical is worth doing.
Can I convert multiple videos at the same time?
Yes. AspectShift-HtoV is built for batch conversion. You can add individual files, a folder, or a mix of both. The app processes every file in the queue sequentially, applying the same settings to each one. You can also select multiple target formats at once — for example, 9:16 and 4:5 simultaneously — and the app will produce both output versions for every input file in a single run.
What is the easiest way to create vertical content?
The simplest workflow in AspectShift-HtoV is: drag your horizontal video files onto the import area, select the platform preset for where you’re publishing (TikTok, Instagram Reels, YouTube Shorts, etc.), enable Blur Background if your footage has important content near the edges, pick an output folder, and click Convert. No video editing experience is required, and the full workflow takes under a minute to set up.
Final Thoughts
Converting horizontal video to vertical for social platforms is one of those tasks that sounds simple but becomes tedious and error-prone when done manually at scale. Center cropping almost always removes the wrong content. Professional editors handle it correctly but require time and learning investment most casual creators don’t have. Online tools tend to be credit-based, require uploads, and don’t support batch workflows.
AspectShift-HtoV addresses all of these problems from a single, straightforward desktop interface. Import your clips, choose your target formats, pick a background effect that preserves your framing, and let the app do the conversion. Every pixel of your original footage stays visible, every output is sized correctly for the platform you’re targeting, and the whole process — whether you’re converting one clip or an entire folder — takes the same amount of setup time.
If you’re regularly repurposing horizontal content for short-form social platforms, AspectShift-HtoV is worth keeping in your workflow.